Melt Them in the Oven and Add These 2 Ingredients for a Genius Garden Hack
Every gardener who sees this goes absolutely wild. And once you try it yourself, you will completely understand why.
Most people toss plastic bottle caps in the trash without a second thought. Hundreds of them — milk jugs, water bottles, juice containers, detergent bottles — ending up in landfills every single year without a single useful purpose. But gardeners who know this trick have turned those throwaway caps into one of the most useful, durable, and completely free garden tools imaginable — and the results are stunning.
All it takes is your oven, two simple ingredients you already have at home, and a small collection of plastic bottle caps that would otherwise be garbage.
Why Plastic Bottle Caps Are a Hidden Goldmine
Before we get into the method, it helps to understand what makes plastic bottle caps so special as a raw material.
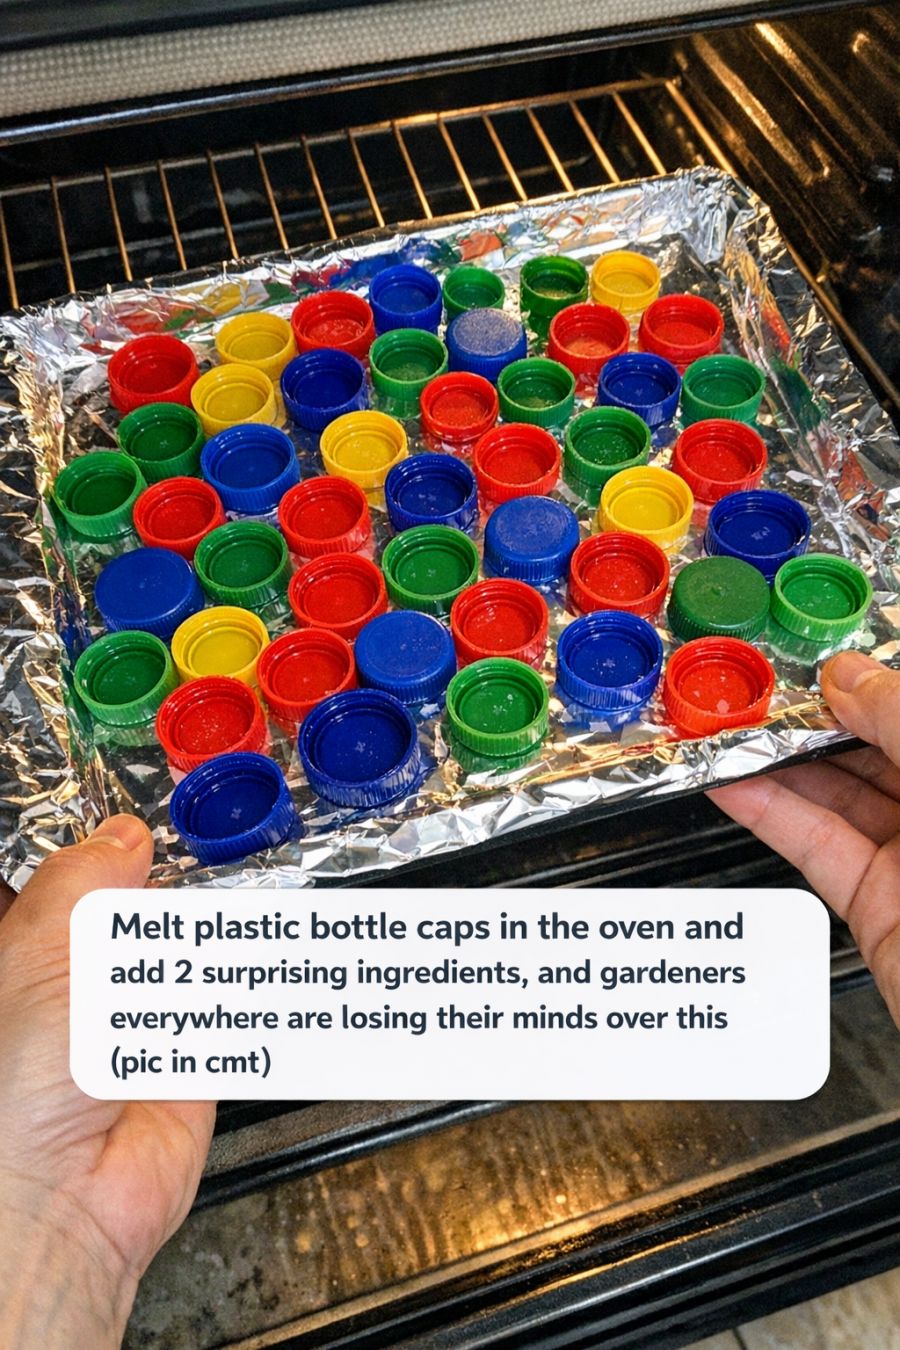
Most bottle caps — particularly those from milk jugs, water bottles, laundry detergent containers, and similar household products — are made from a type of plastic called HDPE, or High-Density Polyethylene. HDPE is stamped with a recycling symbol and the number 2 on the bottom of most containers.
What makes HDPE so remarkable for this project is its combination of properties. It is one of the most durable, weather-resistant plastics available — it does not crack, warp, or degrade in outdoor conditions the way many other materials do. It is completely non-toxic when melted at the correct temperature, producing no harmful fumes as long as the temperature stays within the safe range. It melts at a relatively low and easily controlled temperature, making it safe and manageable at home. And perhaps most importantly for gardeners — it is waterproof, UV-resistant, and virtually indestructible outdoors.
When you melt down a collection of HDPE bottle caps and add two simple ingredients, you end up with a custom material that outlasts wood, outlasts painted labels, outlasts most commercially available garden markers — and costs you absolutely nothing.
What You Are Making: Recycled HDPE Garden Markers
The project that has gardeners everywhere losing their minds is the creation of completely custom, completely weatherproof, completely free garden plant markers made entirely from melted bottle caps combined with two simple ingredients: sand and coffee grounds.
Here is why this combination is so brilliant.
Melted HDPE plastic on its own produces a smooth, somewhat flexible sheet or block that can be cut and shaped but is a bit plain. When you add a small amount of fine sand to the melted plastic as it sets, it creates a slightly textured, gritty surface that makes writing on the marker with a permanent marker far easier — the rougher surface holds ink much better than plain smooth plastic. The sand also adds a small amount of weight and rigidity that makes the finished markers feel substantial and professional rather than flimsy.
Coffee grounds — the second ingredient — serve a completely different but equally brilliant purpose. Mixed into the melted plastic, dried coffee grounds create a dark, rich, natural-looking coloration throughout the finished material that resembles stone or dark clay. This not only makes the markers look beautiful and intentional in the garden, but the coffee grounds also slightly improve the texture of the surface. As a bonus, when the markers are placed in soil, the traces of coffee grounds can actually repel certain common garden pests — slugs and certain insects tend to avoid the compounds in coffee.
The finished product looks like something you would pay good money for at a garden center. It costs you nothing.
What You Need
For the plastic:
A large collection of clean plastic bottle caps — the more the better, as they shrink significantly when melted. Sort by color if you want specific color markers, or mix for a swirled, marbled effect
Only use caps marked with the recycling number 2 (HDPE) on the bottom — these are the safest to melt at home. Avoid PVC (number 3) and polystyrene (number 6) entirely as these release toxic fumes when heated
The two key ingredients:
Fine sand — standard builder’s sand or horticultural sand works perfectly
Dried coffee grounds — used grounds from your morning coffee, fully dried out
Equipment:
An oven or toaster oven — a dedicated old oven or toaster oven is ideal, as you will want to reserve it for craft use after this project
A silicone mold or metal baking pan lined with parchment paper — this is what gives the melted plastic its shape
Wooden skewers, chopsticks, or thick dowels — these will become the stakes that hold the markers in the soil
A sharp craft knife or scissors for trimming
Heat-resistant gloves
Good ventilation — open windows and run a fan
Step-by-Step Instructions
NEXT PAGE
